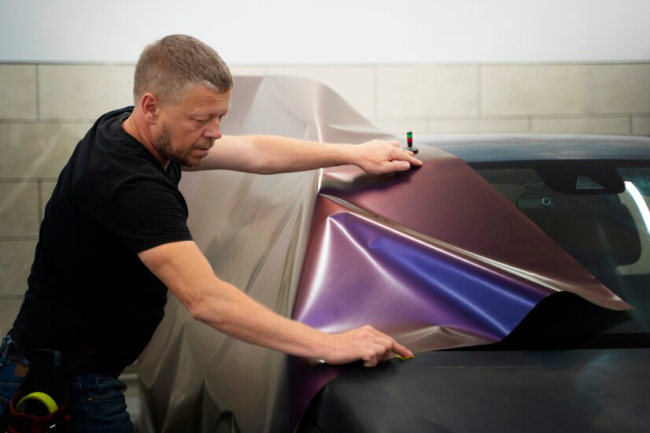
Unveiling the secrets behind a flawless automotive makeover, this blog delves into the intricate art of vinyl wrap removal. As car enthusiasts continue to embrace the trend of vinyl wraps to express their individuality on the road, the importance of understanding the removal process becomes paramount. Whether you’re looking to switch up your vehicle’s aesthetic or rectify a vinyl application gone wrong, navigating the removal journey requires finesse and expertise.
In the realm of automotive customization, vinyl wraps have emerged as a versatile solution, offering a spectrum of colors and finishes. However, the task of undoing this adhesive transformation demands a strategic approach. This blog aims to equip readers with essential tips and tricks, providing insights into the tools, techniques, and considerations that accompany a successful vinyl wrap removal venture.
From selecting the right tools to mastering the delicate balance between patience and precision, embark on a journey through the nuanced world of vinyl wrap removal. As we explore the intricacies of this process, you’ll gain valuable insights into preserving your vehicle’s finish and achieving a seamless transition from one vinyl persona to the next.
Surface Preparation
Before delving into the meticulous task of vinyl wrap removal, it is crucial to prioritize thorough surface preparation. This involves cleaning the vehicle’s exterior meticulously to eliminate any dirt, debris, or contaminants that might compromise the removal process. A pristine surface not only facilitates better adhesion for the vinyl but also ensures a smoother removal experience.
From degreasers to specialized cleaning agents, choosing the right products plays a pivotal role in creating an optimal canvas for the subsequent steps of the removal process. A well-prepared surface sets the stage for a more efficient and successful vinyl wrap removal, reducing the likelihood of complications and ensuring a clean transition.
Choosing The Right Tools
Embarking on the journey of vinyl wrap removal necessitates a carefully curated selection of tools, each playing a pivotal role in ensuring a smooth and efficient process. The right tools not only streamline the removal experience but also contribute to preserving the vehicle’s surface integrity. Here, we delve into the essential tools required for a successful vinyl wrap removal venture.
 Heat Gun or Steamer: A fundamental tool for softening the adhesive, easing the vinyl removal process.
- Plastic Razor Blades: Ideal for gently lifting the vinyl and minimizing the risk of paint damage.
- Isopropyl Alcohol or Adhesive Remover: Effectively tackles stubborn adhesive residue without harming the vehicle’s finish.
- Microfiber Towels: Soft and non-abrasive, perfect for cleaning the surface and ensuring a polished outcome.
- Squeegee or Soft Brayer: Aids in smooth application and removal of the vinyl, minimizing air bubbles.
- Painter’s Tape: Provides an additional layer of protection for the vehicle’s paint, reducing the risk of scratches during the removal process.
In the realm of vinyl wrap removal, the importance of choosing the right tools cannot be overstated. Each tool serves a specific purpose, contributing to a meticulous and damage-free process. Whether it’s the precise cut of a utility knife or the gentle touch of a plastic razor blade, the careful selection of tools ensures that your vehicle emerges from the removal process unscathed, ready for its next customized transformation.
Working In Sections
Efficiency and precision are paramount when tackling the task of vinyl wrap removal, making the strategy of working in sections a fundamental approach. Breaking down the vehicle into manageable segments allows for a more controlled and systematic removal process. By addressing one section at a time, it becomes easier to manage heat application, peeling, and adhesive residue, minimizing the risk of mistakes and ensuring a consistent outcome. This approach also allows for a more strategic use of tools and techniques, contributing to an organized and efficient removal process that yields professional results.
Heat Application Techniques
In the intricate process of vinyl wrap removal, mastering the art of heat application is a pivotal skill. Heat serves as a catalyst, softening the vinyl and adhesive, making the removal process more manageable and reducing the risk of damage to the underlying surface. Proper heat application techniques are essential for achieving a seamless and efficient removal experience, ensuring that the vinyl peels off smoothly without leaving behind residue or compromising the integrity of the vehicle’s finish.
- Temperature Control: Begin by setting the heat gun or heat source at a moderate temperature. Avoid excessive heat, as it may lead to paint damage or uneven softening of the vinyl.
- Consistent Motion: Maintain a steady and consistent motion while applying heat to the vinyl. Moving the heat source in a sweeping motion helps distribute heat evenly, preventing localized overheating.
- Work in Small Areas: Focus on small sections at a time, allowing for precise heat application. This approach ensures that the vinyl softens uniformly, making it easier to peel off without leaving stubborn residues.
- Test and Adjust: Periodically test the vinyl’s flexibility and adjust the heat as needed. This helps in achieving the optimal temperature for efficient removal without causing harm to the vehicle’s surface.
Mastering heat application techniques is a cornerstone of successful vinyl wrap removal. By understanding the nuances of temperature control, consistent motion, and working in small, manageable areas, enthusiasts can navigate the removal process with finesse. The careful integration of heat ensures that the vinyl relinquishes its hold without compromising the integrity of the vehicle’s original finish, leaving enthusiasts with a blank canvas ready for the next exciting transformation.
Protecting The Paint
Preserving the integrity of your vehicle’s original paint during the vinyl wrap removal process is a critical consideration. To prevent unintended damage or scratches, it is essential to employ protective measures. Using soft, non-abrasive tools for removal and applying additional layers of protection, such as painter’s tape or protective films, acts as a buffer between the vinyl and the paint.
This precautionary step is particularly crucial when employing heat during the removal process, as it reduces the risk of heat-related damage to the underlying paint. Prioritizing paint protection ensures that your vehicle emerges from the removal process with its original finish intact, ready for any subsequent customization or restoration.
Adhesive Residue Management
As the vinyl wrap removal process unfolds, one often encounters a persistent challenge—adhesive residue left behind on the vehicle’s surface. Effectively managing this residue is crucial for achieving a seamless transition and preserving the underlying paint. Adhesive remnants can mar the appearance and compromise future customization efforts, making it imperative to employ strategic techniques for their removal.
 Appropriate Solvents: Selecting the right solvent for adhesive breakdown is essential. Products like rubbing alcohol or adhesive removers are effective without causing damage to the paint.
- Gentle Scraping Tools: Utilizing soft and non-abrasive scraping tools aids in the careful removal of adhesive residue without harming the vehicle’s surface.
- Heat Application: Applying controlled heat to the adhesive residue can soften it, making it easier to lift off. However, moderation is key to prevent paint damage.
- Microfiber Cloth Buffing: Gently buffing the treated area with a microfiber cloth helps in removing any remaining residue particles, leaving a smooth finish.
Adhesive residue management is a meticulous process requiring a combination of the right tools, solvents, and techniques. By implementing these strategies, one can ensure that the vehicle’s surface is free from lingering adhesive remnants, ready for a pristine appearance or the next customization endeavor. Careful attention to detail in this phase of the removal process contributes significantly to the overall success and satisfaction of the vinyl wrap removal project.
Patience And Precision
The art of vinyl wrap removal demands a delicate balance between patience and precision. Rushing through the process may result in mistakes, damage to the vehicle’s surface, or a less-than-desirable outcome. Patience comes into play during heat application, allowing the vinyl to soften gradually for easier removal. Precision is crucial when peeling off the vinyl, ensuring a smooth and controlled process that minimizes the risk of tearing or leaving adhesive residue.
The interplay of patience and precision guarantees a meticulous removal experience, showcasing attention to detail and dedication to achieving flawless results. Taking the time to master this balance contributes significantly to the overall success of the vinyl wrap removal project.
Navigating the intricate process of vinyl wrap removal demands a meticulous approach, and we’ve explored the key elements that contribute to a successful transformation. From the crucial step of surface preparation to the strategic approach of working in sections, safeguarding your vehicle’s paint, and effectively managing adhesive residue, every detail matters.
At Quality Auto Glass Tint, our commitment goes beyond vinyl wraps. With over two decades of industry expertise, we specialize in elevating your vehicle’s aesthetic through a range of services, including window tint, paint protection, and windshield repair or replacement. Our team takes pride in turning your auto glass aspirations into tangible reality, ensuring excellence in every aspect of our service.
Your vehicle deserves the best, and Quality Auto Glass Tint is here to deliver. Whether you’re looking for window tint, paint protection, or windshield services, trust our experienced team to exceed your expectations. Visit our conveniently located facility at 9110 Fairway Dr, Roseville, CA 95678, or reach out to us at (916) 888-8495 or Roseville@qualityautoglasstint.com. We operate Monday to Saturday from 9 am to 5 pm. Embark on your journey to automotive excellence with Quality Auto Glass Tint – where expertise meets innovation!


